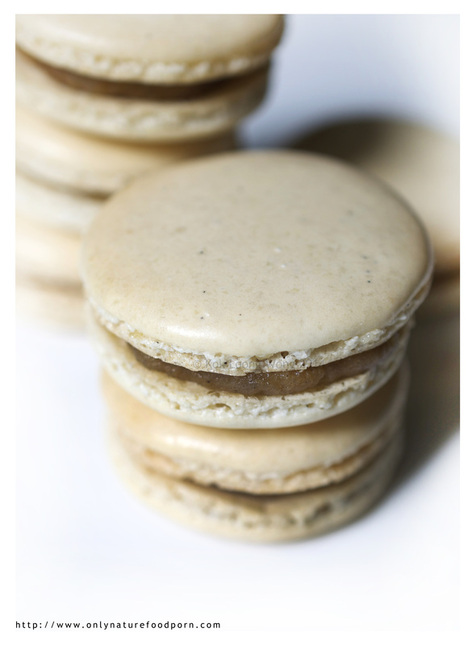
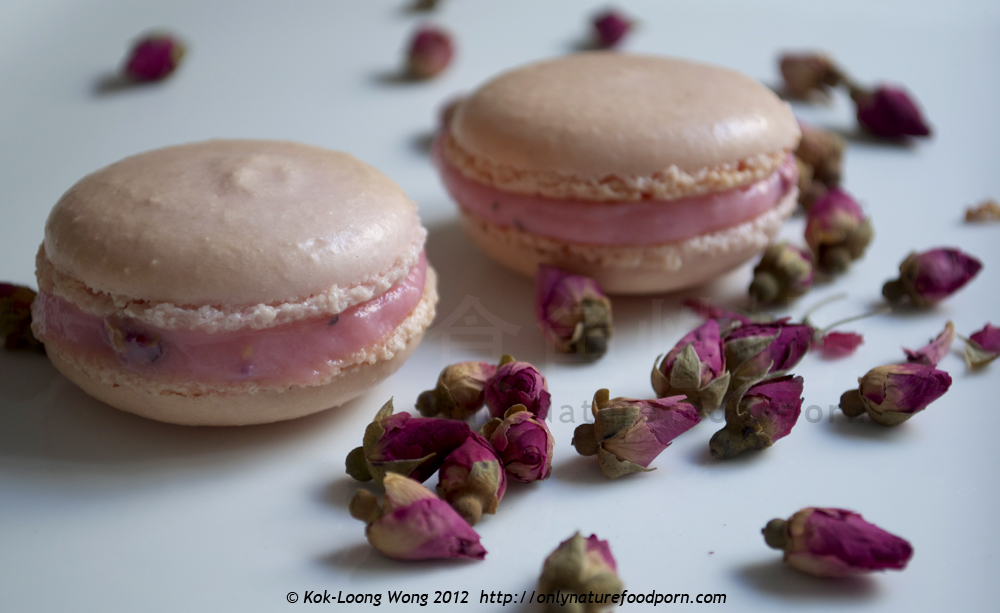
Only Nature: foodporn by Kok-Loong Wong
 
Introducing the Golden Piggy Family!

The first attempt to learn to make these Chinese mooncake inspired pastry. The pastry skin is quite difficult to make. For this trial, instead of using home-made syrup (which I have already prepared few weeks ago. According to the recipe, the freshly made syrup must not be used until it is at least 2 weeks or more old), I read from some online resources, it is OK to substitute the home-made syrup with shop-bought golden syrup. And I also use ready-made sweet adzuki bean paste as the filling for my trial. When I have mastered the whole making process, I will do it properly again with all components home-made!

The recipe book I used for this experiment was a bilingual "Moonlit Mid-Autumn Festival" by Choong Su Yin. I bought the mooncake recipe book many years ago when I was in Malaysia visiting my family. I have read it MANY times, but not gutsy enough to try to make them in the kitchen! I am still trying to understand the original recipe from the book, which didn't tell me how long to bake these piggies in the oven. The temperature of 180'C stated in the book seems way too hot for this sweet pastry dough. Maybe I should not have substituted the home-made syrup with the golden syrup? Maybe the temperature of my oven is too hot? Maybe the ready-made filling is not cooked as per instructed as the recipe? 

But I am quite happy with this first attempt. The flavour is not too bad, sweet scented pastry skin. (slightly too golden syrupy!) A few more attempts to learn the process I think. I am excited!

Note: 26.01.2013 - The pastry skin soften after 2 days which make it really close to those shop-bought mooncake's texture. Really quite tasty now!


Pineapple Jam Pastry

These Pineapple jam pastries slowing becoming my signature bake! I love how the clove acts like the stalk for the fruity looking pastry. So delicate and elegant.

You will normally find this kind of pastry during Chinese New Year. Many home bakers have their own little secret recipes and different interpretations of the shape of how these pastries should look like. I have made them with apple jam before, so I shaped them round-ish to resemble the apple (Picture below - I think my baking skills have improved a lot! I made those apple jam pastries in 2009!).

For these pineapple jam pastries, I shaped them into a large almond shape but slightly rounded top and bottom part of the pastry before inserting the whole clove to the top end. 

They are prefect for afternoon tea, or as little gift for a special occasions.

It is not particular easy to make these pastries. I have made the pastry dough a bit softer by adding more boiling water. This will give a very buttery and delicately lighter pastry skin.

You should prepare the pineapple jam few days ahead before making the pastry. This will allow the jam cool down and slightly thicken to the right consistency to shape them into small balls.

To make the pineapple jam. You will need:
  1. 1 Large  Pineapple. (Skinned and discard the core. Coarsely grated. Then squeeze all the juices out (don't waste it!) and set aside.) (Pineapple juice is particularly good for preventing bloating and acidity.)
  2. The amount of the sugar should be the same weight as the grated and drained pineapple.
  3. A few cloves
  4. 1 Cinnamon bark.

Put all the ingredients in a pot and slowly cook it over high heat for approximately 15 minutes. Reduce the heat and cook further until the pineapple jam is thicken and glossy. Let it cool down completely and shape them into small balls for later.

To make these pastry, you need the following ingredients:
  1. 170g Plain flour
  2.  1 tbsp Sugar
  3. 140g butter (cold and finely diced)
  4. 1 Egg yolk (lightly beaten)
  5. Small pinch of salt
  6. 2 tbsp hot boiling water
  7. Extra few handful of flour (for kneading)

Grease a baking sheet with butter and pre-heat the oven to 150'C.

In a large bowl, mix the flour, salt and sugar together and then rub in the butter until the mixture resembles breadcrumbs. Add in the beaten egg yolk and the hot boiling water. Mix it to form a dough. Add a few handful of additional flour if the dough mixture is too wet. The dough should be quite soft but not sticky. Shape the dough into a ball and wrap it in a piece of cling film and chill it in the fridge for at least 1/2 hours.

Once the pastry is ready, roll it out into a tube. Divide the dough into equal portions. You should be able to make at least 20 pastries (depending of the size you want to make).

Roll all the divided dough portions separately into small balls. Slightly flatten each ball with your palm and then roll it out with the rolling pin. Carefully wrap the pineapple jam ball with the dough. Shape it nicely and stick one clove to the top of the dough. Place it to the greased baking sheet.

Repeat the whole process until you have make use of all the dough. Chill the pastry in the fridge for 20 minutes.

Prepare the glaze by mixing 1 whole egg, 1 egg yolk and 1 tsp water together. 

Brush each pastry carefully with the glaze and then chill them in the fridge for further 10 minutes. 

Bake them in the oven for 15 minutes. Then lower the temperature to 125'C and bake them for further 15 minutes. Remove the pastries from the oven and let them cool down completely on the wire rack. They should be ready!

But, for the finishing touch, if you think the pastry is a bit too pale. Once the pastries are cool, brush another layer of the glaze and bake them in 150'C oven for few more minutes until they are golden in colour.

ALL Done! Quite a long process, but it is worth it!

If you would like to learn how to make these lovely pastries, let me know! I can provide 1:1 tuition or small group cooking classes arrangement at your connivence. Please get in touch here...


Rose Water Macaroons

I am really having a lot of fun with my weekly cooking challenge. Yesterday, I decided to give macaroon another try - 3rd attempts! I was determined to make it a success this time! I followed the recipe from L’atelier des Chefs (where I took the macaroon making class last year)  - word by word (to an extent!) and all the tips that I can remember from the 2 hours class. I even bought a digital scale so that I can measure all ingredients very precisely!

I am quite pleased with the end result! Although the rosy pink colour of the macaroon shells is not as I had imagined (like the rose picture I took recently at Dyke Road Part in Hove) (I think I should have used powder food pigment rather than those liquid type) but I think the overall appearance of the macaroons wasn't too bad! I think I have gained a lot of confidence to make better looking macaroons next time round!

I am also quite happy with the photograph of these macaroons with the scatter of the edible dried rose buds. Very lady-like...(I bought these rose buds in a herbalist shop from my last trip to Malaysia. You can use them for making rose tea). I think they look great for a lady high tea...(Imagine the scene Emily and Florence from Little Britain having a I-am-a-Lady high tea moment!...Very Funny!)

Depending on the size of the macaroon shells you pipe, this recipe can make at least 24 macaroons.

I have adapted the recipe from here. I did add a teaspoon of rose water essence to the meringue mixture. So the macaroon shells have a hint of rosy flavour. I have also sifted the almond powder once before measuring it to the required weight of 250g (and discarded those bigger almond grain for other uses) This I think will result a smoother almond and meringue paste.

For the rose flavour filling, I added some crushed dried rose petals to the rose water flavour custard (with red food colouring). I think the not-too-sweet and subtle rose water custard filling complements the sweet macaroon shells very well. Really quite refreshing for an afternoon tea...just like how Emily and Florence would have it when they have their LADY day out in the countryside! 
 
 
Picture
Cheesy Biscotti! 
I think one can adds any edible ingredients to make biscotti! Recently I have made Biscotti with Irish Cream, Cherry Brandy, and Wensleydale cheese with cranberries! Maybe I should set up a biscotti specialist shop selling just a variety of biscotti! On a serious note, If you are interested to make an order for some home-made biscotti, please let me know! I really should start capitalise my baking/cooking skills!

For the experiment, I followed the basics from my previous biscotti recipe but added about 50g Wensleydale cheese with cranberries to replace the coffee extract and mixed spice. Dust the shaped mixture with flour before baking to give it a rustic look!

These biscotti has a gentle taste of the cheese (not cheesy at all as the title suggest!) and not overly sweet, probably good with a bowl of soup!

What else can I use to create other interesting-flavoured biscotti?? Watch this space! :)


Picture
Picture
Mixed Fruit and Pumpkin Seed Biscotti
The original post was published on: Nov 6, 2010 @ 23:17. It was featured on www.foodbuzz.com/top9
Today's top 9. My third feature post on the website. Another happy memories!


What make cooking feels good is that when people enjoying the food you made for them, and that your efforts were appreciated by them slowly munching away the food in contented silence. I like making cookies as gift for friends. I have made these mixed fruit and pumpkin seed biscotti for my friends and family. They seemed to like it...These biscotti are very easy to make but quite  impressive as a gift. Why not make it as your very personal Christmas gift for your friends and family?

Ingredients:
  1. 85g Un-refined cane sugar
  2. 1 Large egg
  3. 140g Plain flour
  4. 1/2 tsp Baking powder
  5. 1 tsp Ground mixed spice (or allspice)
  6. 50g Mixed dried fruits
  7. 50g pumpkin seeds
  8. 1 tbsp Coffee extract (or freshly brew strong coffee)
  9. Oil (for greasing the baking sheet)

The Process

Pre-heat the oven to 180'C. Grease a baking sheet and set aside.

In a large bowl, whisk the egg and sugar together until pale and thick enough to form  a trail. Measure all ingredients and sift the flour, baking powder and mixed spice and fold them into the egg mixture. Add the coffee extract. Mix to combine the flour and egg then stir in the fruits and seeds and mix lightly to a smooth dough. (The mixture can be a little sticky, coat your hand with flour when handling them)

On a lightly floured surface, shape the mixture into a long roll, and transfer it to the greased baking sheet. Reshape the roll on the baking sheet, slightly flatten the top the roll. Bake in the oven for 20-25 minutes, until lightly golden. Remove the baking sheet from the oven and set aside to cool for few minutes. 

Use a sharp knife, cut the roll, diagonally, into approximate 1.5mm thick slices. Arrange the slices back to the baking sheet. Bake in the oven for further 10 minutes or until golden.

Remove the biscotti from oven and place them on a wire rack to cool before storing them in an airtight container. These biscotti will keep for 2-3 weeks. (If only you can resist them temptation...!)

Serves it with a nice cup of coffee...

 
    Picture

    Enter your email address:

    Delivered by FeedBurner

    Loading

    About my cooking

    I started cooking when I was about 10 years old. Even now, I vividly remember my grandmother showing me how to dry-fry black beans over the charcoal stove. As I stood beside her watching the beans hitting the wok, their sound changed from a dull rustling to a lively high "tinging" pitch. A light dry smell, like burnt coffee, filled the kitchen.

    My aim is to cook appetising, yet humble, food that satisfies not only our taste buds and our stomachs, but also our eyes and imagination. I hope to use this blog to show how simple, affordable ingredients can be easily transformed into delicious and beautiful dishes for daily meals.

    Visuals

    Categories

    All
    Bread Making
    Cake Baking
    Cookies
    Desserts
    Experiment In Colours
    Experiments In Colour
    Experiment With Colours
    Fruit Preserves And Condiment
    General Thoughts
    Italian Affair
    Italian Affairs
    Pastry Challenge
    Quickies
    Roast
    Slow Cooked
    The Taste Of Asia

    Archives

    October 2012
    September 2012
    August 2012
    July 2012
    April 2012
    March 2012
    February 2012
    January 2012
    December 2011
    November 2011
    October 2011
    September 2011


    1
    1
    1
    All recipes are on Petitchef