Only Nature: foodporn by Kok-Loong Wong


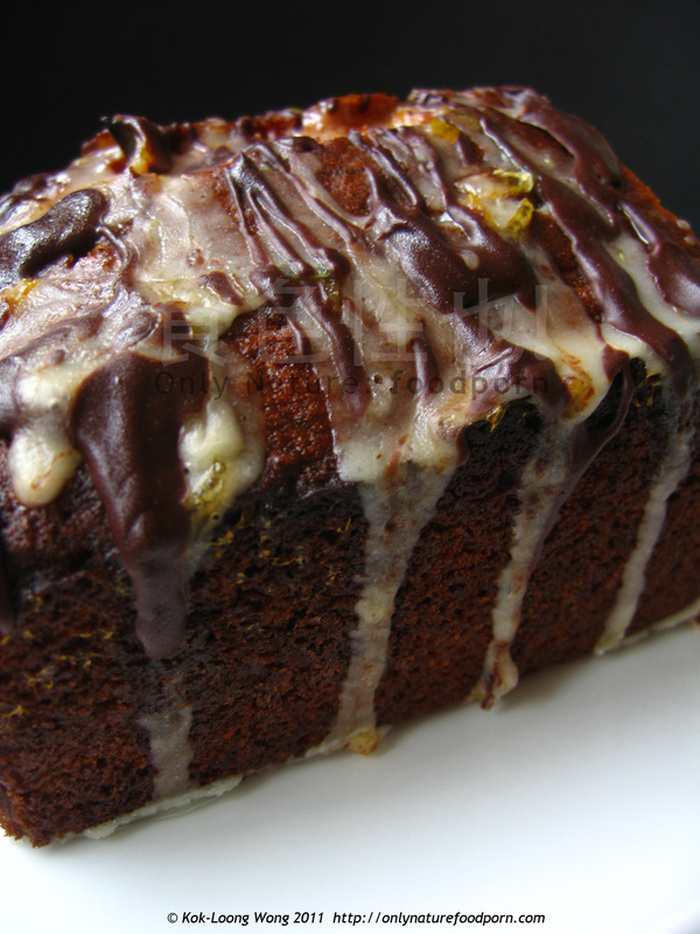
Satsuma Marmalade Cake
I find baking really a therapeutic process. I was really tired and a bit upset over the job interview on Friday. It went OK, but I know I could have done and explained myself better! There is no point in dwelling on the past..

When I was making this cake, I was really relaxed and focused, because I know one hour or so later, I will have a delicious cake to enjoy! All the upset will just evaporated away!

I have made the same cake but with thinly sliced satsuma topping for my friend, Chris, few weeks ago, He seemed to enjoy it. His comment was: "NICE CAKE  Moist, not too sweet, very subtle flavour. WE LIKE."

I think the dark chocolate and marmalade icing toppings are good improvement from the previous cake. The satsuma marmalade's citrusy note complement very nicely with dark chocolate. I can not really remember the the process and the exact ingredients for making the marmalade, as I was mainly experimenting with some of the leftover satsuma's skin few weeks ago! I will make more of these satsuma marmalade for Christmas.

For the cake, you will need the following ingredients:
  1. 175g butter at room temperature
  2. 175g unrefined golden caster sugar
  3. 2 satsumas 
  4. 3 large eggs
  5. 2 1/2 generous tbsp satsuma marmalade (or other shop-bought flavours)
  6. 175g self-raising flour (sifted twice)

First pre-heat the oven to 180'C.
Grease a loaf tin generously and then line it with baking paper. Grease generously again on the baking paper.

In a large mixing bowl, add the butter and sugar and beat them until pale and fluffy. Grate the satsumas and mix the zest to the butter mixture. Break the eggs in a bowl, and lightly beat them with a fork. Pour the egg to the butter mixture in 3 patches. Beating throughly between each addition. Finally, beat in the marmalade.

Sift the flour twice. With a large metal spoon, fold in the flour gently and carefully but firmly until there is no sign of any flour. It should take less than a minute to completely mixed in the flour. 

Pour the batter into the prepared loaf tin, and lightly smoothen the top. Bake for 40 minutes, check the cake at around 35 minutes with a skewer. Insert the skewer to the centre of the cake,If it comes out clean, the cake is almost done.

Once ready, remove the cake from the oven. Prick all over the cake with the sweker. Squeeze one juice of the satsuma, and spoon the juice all over the cake and  set aside to let it cool down in the tin. After that, remove it from the tin and let it cool down completely on a wire rack.

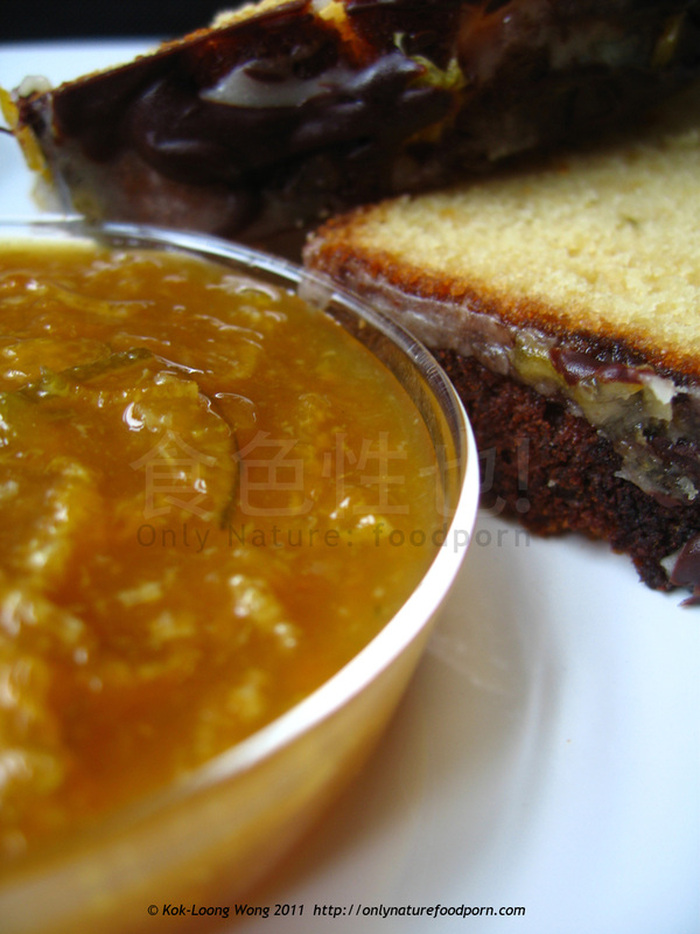
For the topping 1: (Marmalade icing)
  1. 2 generous tbsp icing sugar
  2. 1 generous tbsp satsuma marmalade
  3. water

Mix all icing ingredients to form a thick but slightly runny paste. Drizzle the mixture all over the cooled cake. Let it run down the sides.

For the topping 2: (Dark Chocolate drizzle)
  1. 50g dark chocolate
  2. a knob of butter

Melt the chocolate on a double boiler and add the knob of butter and stir well. While it is still hot, drizzle the melted chocolate over the cake. Set aside the cake to let cool.

Done!
 
 
Almond Bean Curd
I think the fragrance of the almond extract complement nicely with the soy milk. You can get the ready-mixed almond flavoured agar-agar packages from the shop but it is quite simple to make from just with some basic ingredients.

Ingredients:
  1. Approximate 900ml sweetened soy milk
  2. 2 tbsp almond extract or essence (to taste)
  3. 4 tbsp sugar (to taste0
  4. 10g of plain agar-agar (pre-soak for 20 mins) or 2 tsp of plain agar-agar powder
  5. Few sliced peaches for decoration
Slowly heat the soy milk and then add the almond extract and sugar, stir to dissolve. Bring the mixture to boil. Add agar-agar and stir well until fully dissolved. Pour into a square container or mould. Leave to cool until set and keep it cold in the fridge.

Serves the almond bean curd cold and cut to diamond shapes and decorated it with the peaches.
 
 
Roast Pork Belly with Mango Relish
Something simple for the summer? But the Summer days are now far gone..The weather is turning cold and wet....and grey...However, we can always make our food look summery..

The last "harvest" from this year's vegetable "garden"..well actually it is the "thining-out"of the salad leaves seedlings from the various pots by the window sill. Nothing beats the fresh "spring" vegetable....

The mongo relish compliment very well with the roast.

For the mango relish, I shredded half of an unripe mango. Mix it well with 1 tbsp black pepper syrup, and home-made rose hip chilli jelly. Keep it in the fridge for later.

Marinade ingredients for the Pork Belly (One generous slab):
  1. Caraway seeds
  2. 1 juice of lemon
  3. 1 zest of lemon
  4. Salt & pepper (to taste)
  5. 1-2 tbsp olive oil
  6. Few sage leaves

Break the caraway seeds in a mortar and pestle. Mixed all ingredients together and marinate the pork for at least 1 hr.

Pre-heat the oven to 180'C. Once the pork is ready, roast it on a roasting tin with wire rack for around 90 minutes (or until the pork is cooked, depends on your oven!)

At the last 10 minutes, brush generous amount of rose hip chilli jelly (or honey) on the skin of the pork, and roast for  10 minutes. When ready, remove from oven and wrap with foil and set to stand for 15 mins.

Serves the pork with cold mongo relish and spring vegetable salad...Nice summery and colourful dish for winter!


Korean Cucumber Pickles
I have not been very well disciplined lately with myself to eat sensibly and healthily. I can feel that I am gaining a couple of pounds. It is time to eat well and lose some weight!

When I was in Malaysia about a years ago, I bought a book about vegetable and fruit enzymes; a rather popular and trendy home-made health food supplement. It claims that:

   "enzymes provide energy, improve the ability of self-discovery and acts as a health wizard that manages your health"  
     excerpted from Active Vegetable and Fruit Enzymes by Anna Phua. 

How vegetable and fruit enzymes "improve the ability of self-discovery" is rather questionable. But I think to replenish enzymes and eat a lot of vegetables and fruits shouldn't cause any harm to our body! The enzymes will act as a cleanser to expels toxins in the body, accelerate digestion/ metabolism, strengthens the immune system and promote blood circulations etc etc....All sounds rather good, especially if you consumed too much artificial and chemically-produced food.

This Korean cucumber pickles is one of the easiest recipes in the book. It is crunchy and delicious, especially tasty with some grilled oily fish such as mackerel! I mixed the cucumber pickles with the juices to some couscous and Quinoa to make rather nice and health meal out of it!

For my version, I replaced the organic brown rice vinegar stated in the recipe book with the apple cider vinegar.

Ingredients: (enough for 2 portions)
  1. A whole organic cucumber (washed throughly, deseeded and thinly sliced)
  2. 2 tbsp salt salt

Seasonings:
  1. 1 fresh chilli (washed throughly, deseeded and finely chopped)
  2. 2 cloves of garlic (minced)
  3. about 5 tbs apple cider vinegar
  4. 2 tbsp Demerara sugar
  5. 2 tbsp lemon juice
  6. 1 tbsp light soy sauce
  7. 3 tbsp diced spring onions

Marinate the cucumber slices with the salt in a large glass bowl and set aside for 30 mins. After that, rinse with mineral water and drain. Press firmly to remove any excess water from the cucumber.

Mix the seasoning ingredients with the cucumber. Place in cold storage for a day then it is ready to be served.


Nyonya Kuih: Sago Pudding with Sticky Palm Sugar Coconut Sauce
Never thought sago pearls have other usages other than to make honey dew and sago dessert! I came across some Nyonya recipe books in Malaysia last time when I was there visiting my family. Some of the recipes call for sago pearls to make Malay kuih (cake/snacks in Malay language). Here I am testing some of the kuih recipes!

I wish I made the sticky palm sugar coconut sauce when I served it to a friend, Steven. It makes a lot of different to the kuih...Quite unusual texture and quite springy to chew, the sticky palm sugar coconut sauce make the kuih more flavoursome and really add further taste depth to the kuih too, I think!

Ingredients: (For the kuih)

  1. 350g Sago (Pandan flavour) - soak in cold water for 15 minutes and drain.
  2. 50g Black sago (optional- to give colour to the kuih). Boil in water until soft. Drain
  3. 150g Sugar
  4. 1 tsp Salt
  5. 1 tbsp Pandan essence
  6. 1 tbsp Vanilla essence
  7. Approximate 200ml Thick coconut milk (1/2 a can)
  8. Freshly grated coconut for garnish (or desiccated coconut)

Mix all ingredients in a big bowl and then pour the mixture into a greased glass baking tray, steam the mixture until cooked through (the sago should be transparent in appearance). Remove from the heat and set aside to cool down completely.

Meanwhile, in a pan, heat the remaining coconut milk and 1 log of the palm sugar until the sugar completely dissolved and thicken.

Cut the kuih into bite-size rectangular shapes and serves it warm or at room temperature with the sticky sauce...
 
 
Westcliff Sourdough Bread - Round 2
These sourdough making processes really excites me at the moment. I can not help but obsessively checking the raise and fall of the dough during the last 24 hours. 

Compare to the first loaf of sourdough bread from the same starter, this second loaf looks and tastes a lot better! It raised quicker, the texture is very good with a lot of air holes in the bread, it is half the weight of the first loaf. 

So pleased with myself for experimenting making the bread. A new cookery skill acquired!

Nothing beats a freshly bake slice of bread with some fresh lightly seasoned avocado and tomato toppings...yummm...
 
 
Parmesan Cheese Scones
My Italian boss bought me a piece of good quality parmesan cheese from Italy, and It has been a precious little thing for my pasta dishes lately. All good things must come to an end, instead of grating the last bit of the cheese to pasta, I want to give it a special end...A patch of savoury cheese scones topped with cayenne pepper powder.

Ingredients:
  1. 50-75g grated parmesan cheese (keep 1-2 tbsp for topping)
  2. 225g Self-rising flour (sifted) (extra to flour the rolling pin and surface)
  3. 50g Butter (at room temperature)
  4. 2 tbsp Sugar
  5. A good pinch of salt and cayenne pepper powder
  6. 1 tsp Baking powder
  7. 3-4 tbsp Soy milk
  8. 1 Egg

The Process

Preheat the oven to 180'C. Grease the baking sheet with butter.

Mix all dry ingredients together, and rub in the butter until it resembles a fine bread crumbs consistency.

Mix the egg to the dry ingredients, stir in the soy milk, and mix until the dough is well combined. (around  2 -3 minutes). If it is too sticky, add a little bit more flour to the dough.

On a lightly floured surface, roll out the dough, and use a cookies cutter to cut out the shape, and arrange the scones on the baking tray. Brush the scones with some milk, top it with cheese and cayenne pepper.

Bake for around 15 minutes or until it is nicely risen (with some horizontal cracks at the middle of the scones) and the skin is crisp and  lightly golden.

Delicious...


Kiwi Meringue Tarts
This is the spin-off from the lime meringue pie I made previously. Using the leftover pastry, I managed to make 6 kiwi meringue tarts. I thought it would be quite nice to add some colours to the tarts, something vibrant! I always love the colour of the kiwi fruit. Unfortunately, when I follow the pie filling recipe for the lime meringue pie, under the heat, the lovely green colour of the Kiwi fruits started to turn into dull yellow. The easiest way to rescue the colour is to add natural food colourings! I added a teaspoonful of the mixture of green and yellow powder to the pie fillings.

Since completed these tarts, I have been thinking what is the best way to preserve the colour of the Kiwi fruits (without adding food colourings) for making these kiwi tarts. IF I managed to find a way, I think these tarts can be a very beautiful display.

Experiment continues...

ps. I replaced the lime zest and lime juice with 3 roughly chopped kiwi fruits to make the pie fillings


Banana Muffin Surprise!
The basic of the recipe is from "Nigella Express" with a twist...

Ingredients: (make 12)
  1. 3 large ripe banans
  2. 125ml vegetable oil
  3. 2 eggs (large) or 3 eggs (medium)
  4. 250g plain flour
  5. 100g sugar
  6. 1/2 tsp bicarbonate of soda
  7. 1 tsp baking powder
  8. homemade blackberry jam (or shop bought) (for the filling, "the surprise")

Preheat the oven to 200'C. Lined muffin tin with muffin papers. Mash the banans and set aside. Mix and beat oil and eggs in a separate bowl. Mix all dry ingredients and then pour the egg mixture in and mix well. Add the mashed bananas and combine well.

Place equal amount of the mixture to the muffin paper (half full), then spoon in 1 teaspoon of blackberry jam in the middle of the mixture and cover with the remaining muffin mixture.

Bake for around 20 mins. Quite simple but delicious as breakfast.
 
 
Home-made Yoghurt
I used to make my own yoghurt at home, but I have not make any for a long time now. At the beginning, I always thought it must be a very difficult process to make it at home, I imagined one needs to have various sophisticated equipment for yoghurt making.

Only after a quick search online, I realised that it is really easy to make yoghurt at home with just some simple cooking equipment. So I thought I will give It a try and It has been a rather interesting process to learn more about yoghurt.

The word “yoghurt” is derived from Turkish word related to “yoğurmak”  - 'to knead' and “yoğun” -  "dense" or "thick".

Yoghurt is believed to have been around for 4,500 years. Basically yoghurt is a semi-solid dairy product produced by the process of fermentation of milk. It is a process of transforming the lac-tose presence in the milk to produce lactic acid which acts on milk protein to give yoghurt its taste and texture.

In 1919, Issac Carasso , an entreprenuer from Barcelona started a small Yoghurt business. He industrialised the production of yoghurt and named the business after his son “little Daniel” - Danone. I am sure everyone heard of this brand, and it is now a leading producer of dairy products in the market.

We all know the health benefits of yoghurt. The live cultures present in yoghurt have various beneficial effects on our digestive systems. Regular intakes of yoghurt containing live cultures such as Lactobacillus Bulgaricus will help strengthens and stabilize our immune system. Lactic acid of yoghurt maximise calcium absorption. Not only that, yoghurt is rich in potassium, calcium, protein, and B-vitamins (B-12) riboflavin.

Do you know that only yoghurt that contains live cultures can be considered as a health food? If you look closely at most yoghurt packaging, it often stated that the yoghurt is made from live cultures, but the reality is, ALL yoghurt is made with live cultures at the beginning of the process, but many yoghurt products are heat-treated after the fermentation of the milk. This is to prolong shelf life of the product, so it can be kept in the supermarket for a longer period of time. During the process of heating, though, most of the bacterial in the yoghurt will be killed with the result that, what we actually eat is basically a flavoured and sweet dessert that have very LITTLE health benefits.
So, do look out for yoghurt that contains  live cultures if you are looking for a healthy version.

The equipment you need to make yoghurt at home are:
  1. Pot to boil the milk
  2. Empty jam jars or plastic containers to keep the milk mixture
  3. Cooler box to store the jars/ plastic containers.
You will need milk and a small tub of store-bought plain yoghurt (make sure to check the label that it contains live or active cultures). To make 1 kg of plain yoghurt, you need to get 2 pints of milk, and 2 or 3 tablespoonful of the yoghurt starter.

  1. Heat the milk in a pot for around 10 min until foam is starting to appear around the pot. (stir regularly to prevent burn at the bottom of the pot)
  2. Remove the pot from the heat immediately once foaming (if you want a fruity flavoured yoghurt, at this stage, you can add some crushed fruits such as strawberries, peach or anything that takes your fancy!)
  3. Let the milk cool down for about 30 mins. The milk should be lukewarm but not hot, as hot milk will kill the live cultures!
  4. When the milk is ready, add 2 to 3 big tablespoonful of the store-bought yoghurt and stir well.
  5. Pour the milk mixture to the empty jam jars or plastic containers. Put the lids on and close it tightly
  6. Boil some water from the kettle.
  7. Arrange the jars in the cooler box, find something to lift the jars from the bottom of the cooler box (this is to make sure the hot water is not in direct contact with the jars) and pour in the hot water.
  8. Cover the cooler box and leave it undisturbed for at least 7 hours. The longer the better, this allows the active bacterial to develop fully. Most commercially produced yoghurt do not allow the bacteria to multiply to the extent that you can when you make it at home. The longer you let the yogurt to sit in a room temperature before refrigerating, the stronger the bacteria cultures will become.
  9. Check after 7 hours. Once the milk become semi-solid, the yogurt is ready to be served!
  10. Keep the yoghurt in the fridge to slow down the fermentation process. You can keep some of these yoghurt for your next batch of fresh yoghurt.
That are the simple 10 steps of making yoghurt at home!

You can also freeze the yoghurt and serves it like ice-cream.

As long as the yoghurt is made by properly fermenting the milk before freezing, the freezing process will not kill any significant amount of the cultures. During the freezing process, the cultures go into a dormant state, but when eaten and returned to a warm temperature within the body, it will become active again to provide all the benefit of normal yoghurt.

Imagine, wouldn’t it be nice to start a day by eating the yoghurt you made for yourself? Knowing that there are no added preservatives, colouring or large amount of sugar in the yoghurt?

 
    Picture

    Enter your email address:

    Delivered by FeedBurner

    Loading

    About my cooking

    I started cooking when I was about 10 years old. Even now, I vividly remember my grandmother showing me how to dry-fry black beans over the charcoal stove. As I stood beside her watching the beans hitting the wok, their sound changed from a dull rustling to a lively high "tinging" pitch. A light dry smell, like burnt coffee, filled the kitchen.

    My aim is to cook appetising, yet humble, food that satisfies not only our taste buds and our stomachs, but also our eyes and imagination. I hope to use this blog to show how simple, affordable ingredients can be easily transformed into delicious and beautiful dishes for daily meals.

    Visuals

    Categories

    All
    Bread Making
    Cake Baking
    Cookies
    Desserts
    Experiment In Colours
    Experiments In Colour
    Experiment With Colours
    Fruit Preserves And Condiment
    General Thoughts
    Italian Affair
    Italian Affairs
    Pastry Challenge
    Quickies
    Roast
    Slow Cooked
    The Taste Of Asia

    Archives

    October 2012
    September 2012
    August 2012
    July 2012
    April 2012
    March 2012
    February 2012
    January 2012
    December 2011
    November 2011
    October 2011
    September 2011


    1
    1
    1
    All recipes are on Petitchef